Featured Posts

Boot Raspberry Pi from a 16MB SD card

Posted by Mike Redrobe | Posted in PC Hardware | Posted on 12-05-2014

Tags:

21

The Pi boots from SD card, and this normally means you have to have at least a 2GB SD card,
but you can instead use a small SD card and a USB pendrive, as I show here.

The Raspberry Pi only needs an SD card at bootup time, it can immediately hand over to a USB pendrive later, and here’s how:

Take one ancient 16MB SD card – yes, 16MB – not the 1000x larger 16GB cards we use nowadays !

You’ll also need a USB pendrive of 2GB or bigger (or usb HDD of course)

1) select your usb pendrive in win32diskimager instead of the sd card, and write the image
(e.g. 2GB raspbian: http://downloads.raspberrypi.org/raspbian/images/raspbian-2013-09-16/)

2) copy all the pre-boot files (9mb) to the SD card
https://www.dropbox.com/s/84r95jovi4rlv64/raspbian-boot-folder.zip
(I had to remove kernel_emergency.img from the normal boot files as that was 9mb in itself)

3) edit the cmdline.txt on the SD card to read /dev/sda2:

That’s it – all done, put SD card and USB pendrive into the Pi and boot up.

Raspicam Remote for Android

Posted by Mike Redrobe | Posted in Phones | Posted on 18-11-2013

Tags: ,

62

Raspicam Remote for Android

Raspberry Pi camera viewer.

RaspiCAM Remote is an app to view the Raspberry Pi camera module on your Android Device.

– NO software needs to be installed or configured on the Raspberry Pi – uses standard NOOBS setup
– Pictures can be saved to your phone’s gallery.
– Continuous “video” mode (around one frame per second) for camera monitoring on your android device
– easily configure and test the camera’s image filters.

Simply type in the ip address of your Raspberry Pi to connect and view straight away.

2014-02-01 11.01.40

Get it on google play:
https://play.google.com/store/apps/details?id=com.pibits.raspberrypiremotecam

Setting up adblock on Raspberry Pi

Posted by Mike Redrobe | Posted in Technology | Posted on 16-03-2013

Tags:

2

So you’re used to browsing on the PC with Adblock installed,
then you use the default browser (midori)
on the raspberry Pi and find the web is full of annoying ads !

This not only distracts, but also slows down page loading.

Unfortunately the version of midori on the pi does not support ad blocking direct in the browser,

While Chrome and Firefox are actually available on the raspberry Pi in the form of Chromium and Iceweasel and they do support adblock plus, they are very slow and bring the low powered Pi to a crawl.

Here is a quick way you can block all the ads. Not only will your surfing be faster but you will also save some bandwidth.

Simply use a hosts file from the guys at MVPS – they maintain a list of ads which we can use.

Open a terminal window and type (or copy and paste) the following:

wget http://winhelp2002.mvps.org/hosts.txt
sudo mv hosts.txt /etc/hosts

Ads are now gone !

We could stop there – but you will quickly realise that many sites show an error where the advert used to be. There is a way around that too – by running a local webserver that shows a blank image in their place.

Kwakd – simple webserver to serve blank webpages / images
http://code.google.com/p/kwakd/

We’ll have to download and compile it on the raspberry pi:

wget http://kwakd.googlecode.com/files/kwakd-0.3.tgz
tar -xvf kwakd-0.3.tgz
cd kwakd-0.3
./configure
make

now we can run it:

sudo ./kwakd -p 80 &

Ads are now removed, and blank images are served in their place.

Enjoy a cleaner and faster web browsing experience !

Play DVD disks in XBMC on Raspberry Pi

Posted by Mike Redrobe | Posted in Software | Posted on 20-09-2012

Tags: , ,

1

Here’s how to add DVD playback support into RaspBMC n your Raspberry Pi
(requires MPEG2 key installed on SD card – buy one here:
www.raspberrypi.com/mpeg-2-license-key/)

i.e. Playback commercial DVDs direct from attached USB DVD drive

While it works well, it only plays the film, no dvd menus.

SSH into the running RaspBMC

Download and compile libdvdcss


wget http://www.videolan.org/pub/libdvdcss/1.2.12/libdvdcss-1.2.12.tar.bz2
sudo apt-get update
sudo apt-get install -y bzip2 gcc make
tar -xvjpf libdvdcss-1.2.12.tar.bz2

cd libdvdcss-1.2.12
./configure
make
sudo make install
sudo cp /usr/local/lib/libdvdcss* /lib

Install mplayer


sudo apt-get install -y mplayer

Make a directory to store the virtual file


sudo mkdir /dvd

Make the background script:

sudo nano /sbin/playdvd.sh

mkfifo /dvd/dvd.mpg
while :
do
        mplayer dvd://1 -dumpstream -dumpfile /dvd/dvd.mpg 1>null 2>null
        sleep 5
done

ctrl+X to save the file

Make it executable

sudo chmod a+x /sbin/playdvd.sh

Add it to startup:

sudo nano /etc/rc.local

add the line

playdvd.sh

before exit 0.

(ctrl+x to save and close)

In the XBMC GUI:

Add /dvd as a video folder in XBMC

When you want to play a dvd, play the dvd.mpg file

The script running in the background will take care of dvd changes.

Play DVD disks on Raspberry Pi

Posted by Mike Redrobe | Posted in Technology | Posted on 19-09-2012

Tags: ,

3

In August the Raspberry Pi Foundation started selling MPEG2 codec licenses for the popular Raspberry Pi.

With this installed, the Pi can decode MPEG2 directly on its GPU chip, with very little CPU usage. The ARM CPU used in the Pi isn’t really powerful enough to decode MPEG2 on its own.

Since DVDs use MPEG2, this is a very welcome addition as it means hardware accelerated playback for DVDs.

Unfortunately due to the legal position on decrypting the CSS encryption on DVD disks, many distributions don’t include the relevent files.

You can get around this by compiling it yourself on the Pi, and here’s how:

Download and extract the libdvdcss source code:

wget http://www.videolan.org/pub/libdvdcss/1.2.12/libdvdcss-1.2.12.tar.bz2
sudo apt-get install -y bzip2
tar -xvjpf libdvdcss-1.2.12.tar.bz2

Compile it (only takes a few minutes):

cd libdvdcss-1.2.12
./configure
make
sudo make install

All done, now copy the libraries over:

sudo cp /usr/local/lib/libdvdcss* /lib

Now we can play a DVD direct from the disk:

mkfifo /tmp/dvdpipe
mplayer dvd://1 -dumpstream -dumpfile /tmp/dvdpipe 1>/dev/null 2>/dev/null &
omxplayer -r /tmp/dvdpipe

This may come to XBMC eventually, but current XBMC DVD code doesn’t allow for hardware acceleration.

Slim down your Raspberry Pi with an RSMMC card

Posted by Mike Redrobe | Posted in Technology | Posted on 04-07-2012

Tags:

0

Just a quick tip for those who want to fit their Raspberry Pi into a small case,
SD cards installed in the Rapsberry Pi stick out a fair amount:
Image Hosted by ImageShack.us

and frank26080115 over on the raspberry Pi forums has even soldered in an adaptor to use a microSD card: http://www.raspberrypi.org/phpBB3/viewtopic.php?f=45&t=9936

If you don’t want to get your soldering iron out, a simpler way is just to use an RSMMC card.
RS-MMC cards are available which are half sized SD cards which usually come with an adaptor to make them SD sized:

Installing an RS-MMC card in the Pi sits flush with the edge, and no longer sticks out:

 
Image Hosted by ImageShack.us

Image Hosted by ImageShack.us

Enjoy your new “slimmer” Pi !

Raspberry Pi case made from a 99p iphone 4 case

Posted by Mike Redrobe | Posted in Technology | Posted on 02-07-2012

Tags:

1

Tinkering with the popular Raspberry Pi, one of the first things you need is a case of some sort to protect it.

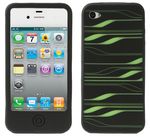
eBuyer.com are currently selling iphone4 silicone cases for just 99p delivered:


Silicone Case for iPhone 4G, Green and Black

99p including delivery in the UK


and you can probably buy them similarly cheap elsewhere.

It turns out these are just the right size for the Raspberry Pi to sit in:

There’s a handy cutout for Pi’s HDMI socket which happens to be in approximately the same place as the iPhone’s sim holder.